石火电光追风逐日|前端优化之次时代图片压缩格式WebP的项目级躬身实践(Python3 PIL+Nginx)

我们知道,在前端界有一个共识:速度就是生命,带宽就是金钱。怎样将页面加载速度有效提升是无数前端工程师无时不刻在思考的课题,目前的网络环境中,除了视频,图片仍旧是占用流量较大的一部分,对于app端尤其如此,因此,如何在保证图片视觉不失真的前提下缩小图片体积,对于节省带宽和电池电量都十分重要,因此Google在十年前提出了一种新的图片压缩格式 :WebP,给图片的优化提供了新的方向。
WebP的优势在于它具有更优的图像数据压缩算法,在拥有肉眼几乎无法识别差异的图像质量前提下,带来更小的图片体积,同时具备了无损和有损的压缩模式、Alpha 透明以及动画的特性,从JPEG 和 PNG 上的转化效果都非常突出、稳定和统一,全球著名视频网站YouTube的视频缩略图采用WebP后,网页加载速度提升了10%,提升效果可见一斑:

本次我们以本站为例子,使用Python3对站内图片进行无损压缩和转换,同时利用Nginx针对Webp图片判断请求头来对老版本浏览器做向下兼容,实现Webp图片的无缝切换。
首先,将网站的图片转换为Webp格式,这里我们使用PIL库,该库广泛用于Python中的图像处理,并且PIL图像库中最重要的类是Image类,该类在模块中以相同的名称定义。
安装PIL:
python3 -m pip install --upgrade pip
python3 -m pip install --upgrade Pillow
可以通过open方法加载图像文件并且展示它:
from PIL import Image
img = Image.open('sample.jpg')
img.show()
Image.convert()方法可以返回该图像的转换后的副本。此方法可通过调色板转换像素。当前版本支持“ L”,“ RGB”和“ CMYK”之间的所有格式转换。save(fp,format)使用两个输入参数,第一个是保存转换后的文件的文件路径(fp),第二个是要转换成的文件格式。
转换JPG到PNG:
from PIL import Image
img = Image.open('sample.jpg').convert('RGB')
img.save('sample.jpg.png', 'png')
转换PNG到JPG:
from PIL import Image
img = Image.open('sample.png').convert('RGB')
img.save('sample.png.jpeg', 'jpeg')
转换PNG到WEBP:
from PIL import Image
img = Image.open('sample.png').convert('RGB')
img.save('sample.png.webp', 'webp')
转换JPG到WEBP:
from PIL import Image
img = Image.open('sample.jpg').convert('RGB')
img.save('sample.jpg.webp', 'webp')
看起来相当简单,有的时候,我们可能需要把某个目录下的图片进行批量转换,首先读取所有需要转换的图片:
import os

files = os.listdir('/opt/img')

images = [file for file in files if file.endswith(('jpg','png','jpeg'))]

print(images)

liuyue:mytornado liuyue$ python3 "/Users/liuyue/wodfan/work/mytornado/test_webp.py"
['qrcode.png', 'touxiang_1.png', 'code.jpeg', 'test.png', 'touxiang1.jpg', 'logo_dark.png', 'logo.png', 'touxiang.png', 'code1.jpeg']
liuyue:mytornado liuyue$
随后建立转换方法:
def convert_image(image_path, image_type):

    im = Image.open(image_path)
    print(image_path)
    im = im.convert('RGB')
    image_name = image_path.split('.')[0]
    print(f"This is the image name: {image_name}")

    if not os.path.exists(f"{image_path}.webp"):

        if image_type == 'jpg' or image_type == 'png' or image_type == 'jpeg':
            im.save(f"{image_name}.{image_type}.webp", 'webp')
        else:
            raise Error
这里我们将转换后的副本统一加上后缀.webp
之后进行转换操作:
for image in images:
    if image.endswith('jpg'):
        convert_image(image, image_type='jpg')
    elif image.endswith('jpeg'):
        convert_image(image, image_type='jpg')
    elif image.endswith('png'):
        convert_image(image, image_type='png')
    else:
        raise Error
这里需要注意的是,是在原图文件名基础上加入后缀.webp,而不是覆盖原图后缀,这样后面替换图片内容时会更加方便。
接下来的课题就是怎样判断客户端的浏览器是否支持Webp格式的图片,目前ios和新版的Safari浏览器已经对webp进行了适配,但是对于老版本的系统和浏览器怎么向下兼容是一个令人头疼的问题。
可以在前端通过js脚本来进行判断:
window.isSupportWebp = false;//是否支持
(function() {
    var img = new Image();
    function getResult(event) {
        //如果进入加载且图片宽度为1(通过图片宽度值判断图片是否可以显示)
        window.isSupportWebp = event && event.type === 'load' ? img.width == 1 : false;
    }
    img.onerror = getResult;
    img.onload = getResult;
    img.src = 'data:image/webp;base64,UklGRiQAAABXRUJQVlA4IBgAAAAwAQCdASoBAAEAAwA0JaQAA3AA/vuUAAA='; //一像素图片
})();

console.log(window.isSupportWebp);
true
原理就是加载一像素的webp判断是否显示成功,如果window.isSupportWebp为true我们就可以将webp后缀加载否则就加载原后缀的图片,但是基于前端的解决方案需要修改大量的代码,同时如果判断业务逻辑放在页面里无形中也增加了页面负担,有没有方法在不变动代码逻辑的前提下,可以自动切换图片后缀呢?答案就在后端的Nginx。
我们知道浏览器的每个请求头中都带有"Accept"字段,例如:
Accept:image/webp,image/apng,image/*,*/*;q=0.8此时通过nginx对Accept进行判断,如果带有webp,说明该浏览器支持webp,我们就由后端加载webp,如果头部没有webp字样,说明浏览器不支持,此时nginx继续加载原后缀文件,这也就是为什么之前在图片转换过程中要保留原始图片文件的原因。
首先打开nginx的mime.types文件,查看nginx是否配置webp,如果没有需要手动加上:
vim /etc/nginx/mime.types可以看到全部文件类型:
types {
    text/html                                        html htm shtml;
    text/css                                         css;
    text/xml                                         xml;
    image/gif                                        gif;
    image/jpeg                                       jpeg jpg;
    application/javascript                           js;
    application/atom+xml                             atom;
    application/rss+xml                              rss;

    text/mathml                                      mml;
    text/plain                                       txt;
    text/vnd.sun.j2me.app-descriptor                 jad;
    text/vnd.wap.wml                                 wml;
    text/x-component                                 htc;

    image/png                                        png;
    image/svg+xml                                    svg svgz;
    image/tiff                                       tif tiff;
    image/vnd.wap.wbmp                               wbmp;
    image/webp                                       webp;
    image/x-icon                                     ico;
    image/x-jng                                      jng;
"/etc/nginx/mime.types" 97L, 5231C                            22,5         顶端
    application/octet-stream                         deb;
    application/octet-stream                         dmg;
    application/octet-stream                         iso img;
    application/octet-stream                         msi msp msm;

    audio/midi                                       mid midi kar;
    audio/mpeg                                       mp3;
    audio/ogg                                        ogg;
    audio/x-m4a                                      m4a;
    audio/x-realaudio                                ra;

    video/3gpp                                       3gpp 3gp;
    video/mp2t                                       ts;
    video/mp4                                        mp4;
    video/mpeg                                       mpeg mpg;
    video/quicktime                                  mov;
    video/webm                                       webm;
    video/x-flv                                      flv;
    video/x-m4v                                      m4v;
    video/x-mng                                      mng;
    video/x-ms-asf                                   asx asf;
    video/x-ms-wmv                                   wmv;
    video/x-msvideo                                  avi;
}
主要查看有没有webp,如果没有进行添加:
image/webp webp;随后修改主配置文件:
vim /etc/nginx/nginx.conf在http配置中加上webp文件的判断逻辑:
map $http_accept $webp_suffix {
    default   "";
    "~*webp"  ".webp";
}
同时在server中配置逻辑,如果支持就将头部信息替换为webp后缀文件:
location ~* ^/v3u/Public/images/.+\.(png|jpe?g)$ {
  add_header Vary Accept;
  try_files $uri$webp_suffix $uri =404;
}
完整配置如下:
user root;
worker_processes auto;
error_log /var/log/nginx/error.log;
pid /run/nginx.pid;

# Load dynamic modules. See /usr/share/doc/nginx/README.dynamic.
include /usr/share/nginx/modules/*.conf;

events {
    worker_connections 1024;
}

http {
    log_format  main  '$remote_addr - $remote_user [$time_local] "$request" '
                      '$status $body_bytes_sent "$http_referer" '
                      '"$http_user_agent" "$http_x_forwarded_for"';

    access_log  /var/log/nginx/access.log  main;

    map $http_accept $webp_suffix {
    default   "";
    "~*webp"  ".webp";
}

    sendfile            on;
    tcp_nopush          on;
    tcp_nodelay         on;
    keepalive_timeout   65;
    types_hash_max_size 2048;

    include             /etc/nginx/mime.types;
    default_type        application/octet-stream;

    	gzip on;
        gzip_min_length  1k;
        gzip_buffers     4 16k;
        gzip_http_version 1.0;
        gzip_comp_level 2;
        gzip_types       text/plain application/x-javascript text/css application/xml text/javascript application/x-httpd-php image/jpeg image/gif image/png;
        gzip_vary on;
        gzip_disable msie6;

	open_file_cache max=1000 inactive=20s;
	open_file_cache_valid 30s;
	open_file_cache_min_uses 5;
	open_file_cache_errors off;

    # Load modular configuration files from the /etc/nginx/conf.d directory.
    # See http://nginx.org/en/docs/ngx_core_module.html#include
    # for more information.
    include /etc/nginx/conf.d/*.conf;

    server {

        location ~* ^/v3u/Public/images/.+\.(png|jpe?g)$ {
  add_header Vary Accept;
  try_files $uri$webp_suffix $uri =404;
}

        include /etc/nginx/default.d/*.conf;

        location / {
        }


        error_page 404 /404.html;
            location = /40x.html {
        }

        error_page 500 502 503 504 /50x.html;
            location = /50x.html {
        }
    }

#include vhost/*.conf;
}
修改好配置文件之后,先不要着急重启服务器,检测一下配置文件语法:
[root@iz2ze0ndt5s9wq2s6ff8g6z nginx]# nginx -t
nginx: the configuration file /etc/nginx/nginx.conf syntax is ok
nginx: configuration file /etc/nginx/nginx.conf test is successful
[root@iz2ze0ndt5s9wq2s6ff8g6z nginx]#
如果没有问题,重启服务:
systemctl restart nginx.service现在让我们来测试一下,以本站的logo图片为例子,如果是不支持webp格式的浏览器,比如低版本的Safari(13.0.3):

可以看到加载图片的类型保持了原图片后缀:png
现在换一个浏览器,使用支持webp的chrome(88.0.4324):

可以看到已经自动切换为webp格式了,让我们再次通过google的页面性能打分工具PageSpeedInsights对本站进行评测: https://developers.google.com/speed/pagespeed/insights/
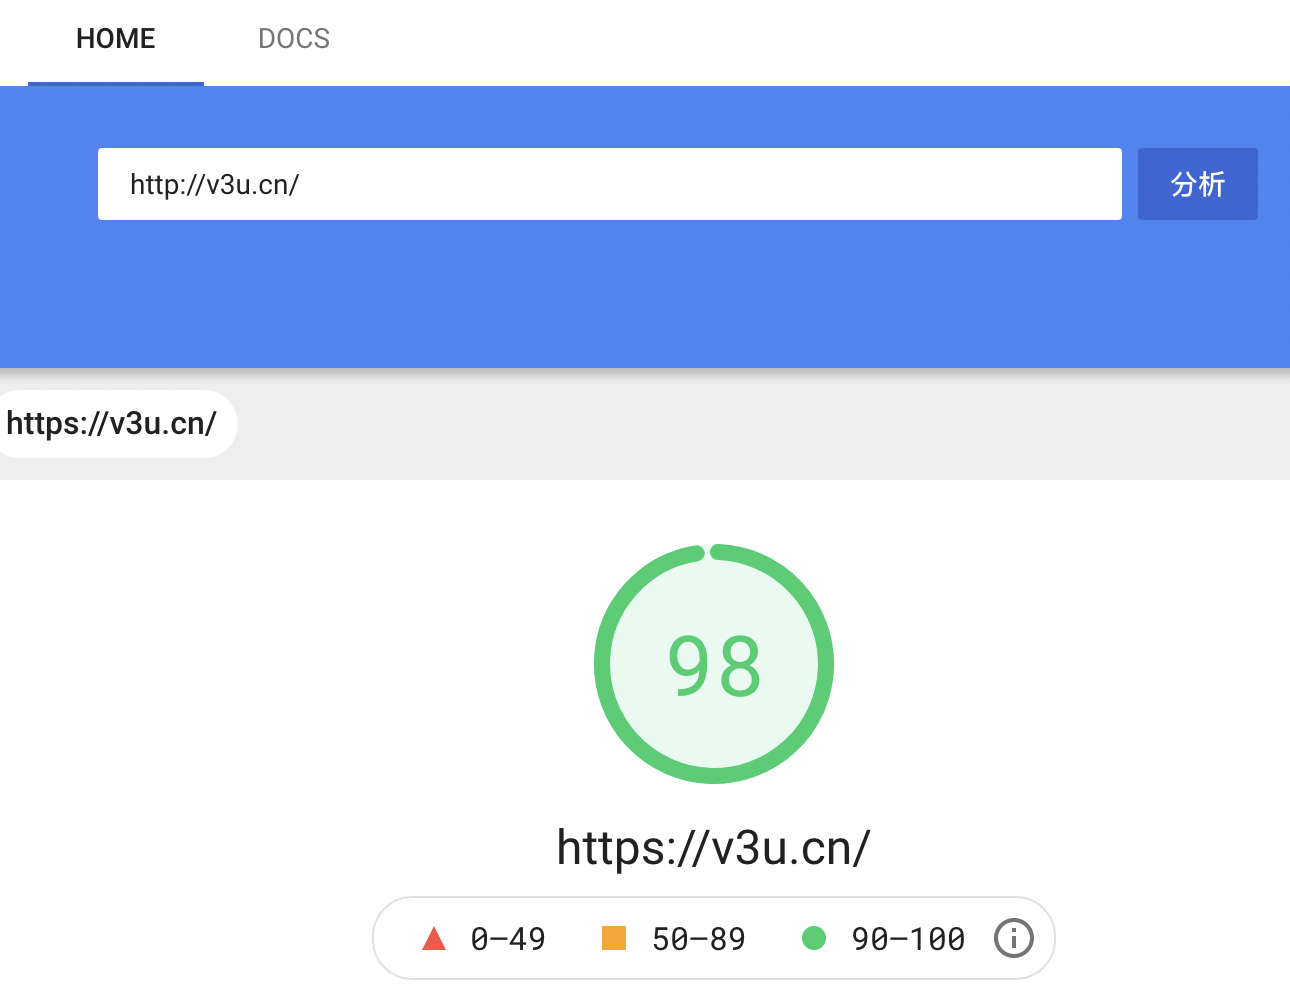

一望而知,页面加载速度得到了提升,并且在Google的页面优化建议中,已经达成了采用新一代格式提供图片的要求。
结语:当然了,其实Nginx是可以对图片进行实时压缩的,但是那样需要单独安装模块以及其他服务的介入,这对于低版本服务器无疑是要耗费成本的,所以本方案就是通过python3脚本提前将图片转换好,再用nginx判断一下即可,仅仅一个脚本+两行配置文件即可完成系统升级,看起来此方案是最佳选择,既没有前端代码侵入,也不需要各种复杂的配置和服务搭建。相信在不远的将来,基于google开源的VP8视频编码格式的 WebM 视频也将会大面积的替代传统的mp4格式,前端架构的性能优化,始终是业界亘古不变的课题之一。