彩虹女神跃长空,Go语言进阶之Go语言高性能Web框架Iris项目实战-完善用户管理EP04
书接上回,上一回我们完成了用户管理页面的构建,并且通过前端的Vue.js框架动态地获取表单数据,同时异步请求后端Iris接口进行入库操作,过程中使用函数封装可复用的逻辑。 本回我们将继续完善用户管理功能。
唯一索引
虽然在之前的章节中已经完成了用户添加(注册)的功能,然而我们忽略了一个重要的细节,那就是用户名(username)应该是全局唯一的字段,而添加逻辑中并未做唯一性校验,事实上唯一性校验有两种方案,一种是入库之前做一次查询,但这样会浪费一次磁盘的IO操作,另外一种就是通过唯一索引进行拦截操作,这里我们采用后者,修改model.go文件:
package model

import (
	"time"

	"github.com/jinzhu/gorm"
)

type Model struct {
	ID        uint `gorm:"primary_key"`
	CreatedAt time.Time
	UpdatedAt time.Time
	DeletedAt *time.Time
}

type User struct {
	gorm.Model
	Username string `gorm:"unique;not null"`
	Password string
}
这里为User结构体的字段Username添加unique索引,随后将user表删除,重新进行数据库迁移操作:
db.AutoMigrate(&model.User{})接着查看表结构:
MySQL [irisblog]> SHOW CREATE TABLE user;
+-------+------------------------------------------------------------------------------------------------------------------------------------------------------------------------------------------------------------------------------------------------------------------------------------------------------------------------------------------------------------------------------------------------------------------------------------------------------------------------------------------------------------------------+
| Table | Create Table                                                                                                                                                                                                                                                                                                                                                                                                                                                                                                           |
+-------+------------------------------------------------------------------------------------------------------------------------------------------------------------------------------------------------------------------------------------------------------------------------------------------------------------------------------------------------------------------------------------------------------------------------------------------------------------------------------------------------------------------------+
| user  | CREATE TABLE `user` (
  `id` int(10) unsigned NOT NULL AUTO_INCREMENT,
  `created_at` datetime DEFAULT NULL,
  `updated_at` datetime DEFAULT NULL,
  `deleted_at` datetime DEFAULT NULL,
  `username` varchar(255) COLLATE utf8mb4_unicode_ci NOT NULL,
  `password` varchar(255) COLLATE utf8mb4_unicode_ci DEFAULT NULL,
  PRIMARY KEY (`id`),
  UNIQUE KEY `username` (`username`),
  KEY `idx_user_deleted_at` (`deleted_at`)
) ENGINE=InnoDB AUTO_INCREMENT=22 DEFAULT CHARSET=utf8mb4 COLLATE=utf8mb4_unicode_ci |
+-------+------------------------------------------------------------------------------------------------------------------------------------------------------------------------------------------------------------------------------------------------------------------------------------------------------------------------------------------------------------------------------------------------------------------------------------------------------------------------------------------------------------------------+
1 row in set (0.00 sec)
发现username字段已经被Gorm添加了唯一索引:UNIQUE KEY `username` (`username`)
随后修改用户添加逻辑:
app.Post("/admin/user_action/", func(ctx iris.Context) {
username := ctx.PostValue("username")
password := ctx.PostValue("password")
fmt.Println(username, password)
md5str := mytool.Make_password(password)
user := &model.User{Username: username, Password: md5str}
res := db.Create(user)
if res.Error != nil {
fmt.Println(res.Error)
ret := map[string]string{
"errcode": "1",
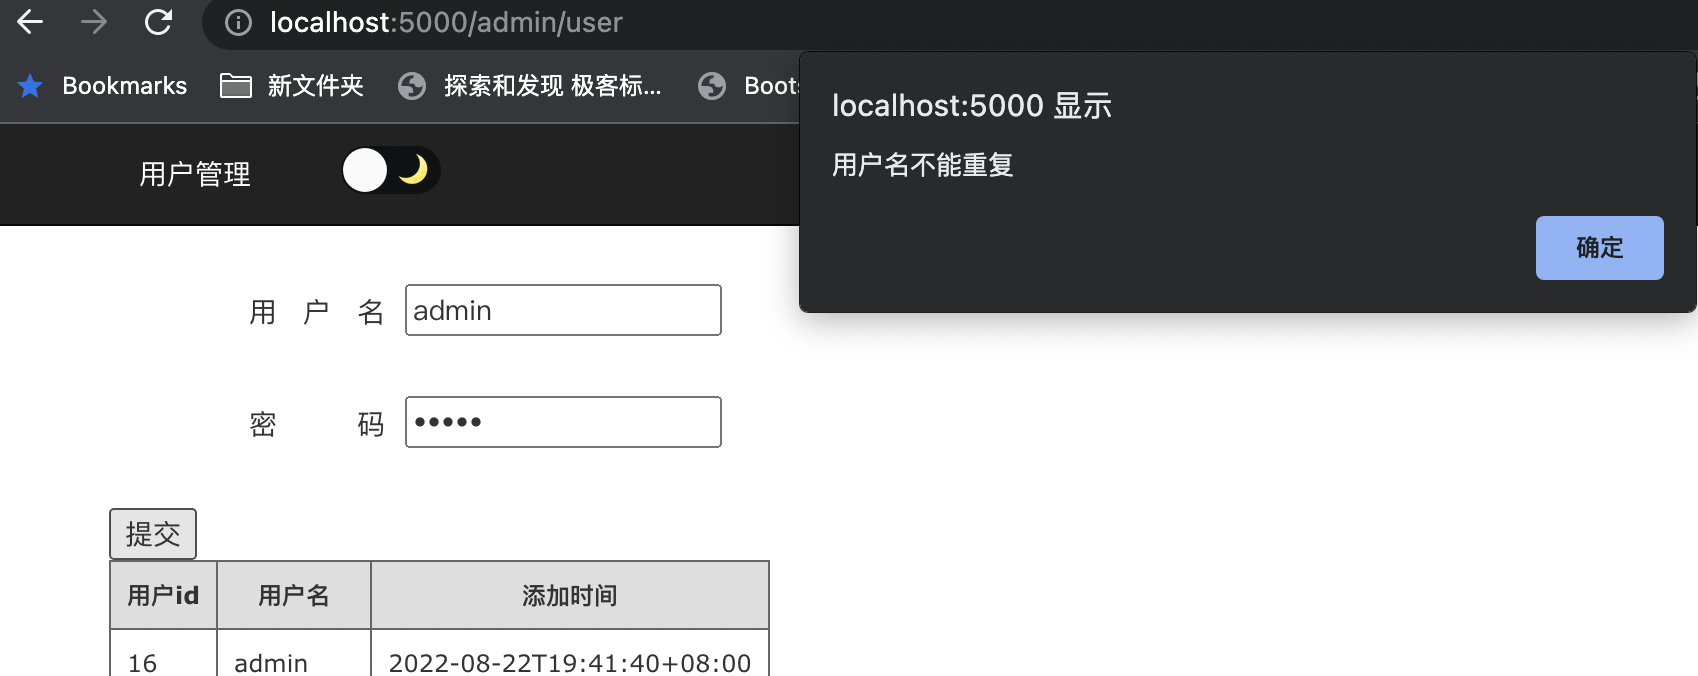
"msg": "用户名不能重复",
}
ctx.JSON(ret)
return
}
ret := map[string]string{
"errcode": "0",
"msg": "ok",
}
ctx.JSON(ret)
})这里res结构体中的Error字段来返回错误,如果Error不等于nil,说明被唯一索引拦截了下来。
随后构建 ret 字典,声明错误码和提示信息,然后使用ctx.JSON函数序列化为Json格式返回给前端,注意别忘了用return关键字结束逻辑,否则代码会继续执行,返回值样例:
{
errcode: "1",
msg: "用户名不能重复"
}
前端接收到返回值之后,可以通过alert方法打印返回值:
submit:function(){


                    this.myaxios("http://localhost:5000/admin/user_action/","post",{"username":this.username,"password":this.password}).then(data => {
        console.log(data)
                        alert(data.msg);
      });

                }
如图所示:
用户更新与删除
用户更新指的是密码的修改,首先需要构造新密码的表单变量:
data() {
                return {
                    //用户名
                    username: "",
                    //密码
                    password:"",
                    //用户列表
                    userlist:[],
                    //新密码
                    newpass:[]
                };
            },
注意,这里是动态表单,因为每一个表单会对应一个用户:
for(let i=0,l=this.userlist.length;i<l;i++){

            this.newpass.push({"value":""})

        }
这里每返回一个用户,就会为该用户对应生成一个value字段。
随后在循环中绑定该字段:
<table class="gridtable">

                <tr>
                    <th>用户id</th>
                    <th>用户名</th>
                    <th>新密码</th>
                    <th>添加时间</th>
                    <th>操作</th>
                </tr>

                <tr v-for="(item,index) in userlist">
                    <td>{{ item.ID }}</td>
                    <td>{{ item.Username }}</td>
                    <td><input type="password" v-model="newpass[index].value"  /></td>
                    <td>{{ item.CreatedAt }}</td>
                    <td><button @click="update(index)">更新密码</button></td>
                </tr>


            </table>
如图所示:
随后绑定单击事件,向后端iris传递参数:
update:function(i){

                    console.log(this.userlist[i].ID);
                    console.log(this.newpass[i].value);

                    if(this.newpass[i].value == ""){
                        alert("新密码不能为空");
                        return false;
                    }

                    this.myaxios("http://localhost:5000/admin/user_action/","put",{"id":this.userlist[i].ID,"password":this.newpass[i].value}).then(data => {
                        console.log(data)
                        alert(data.msg);
      });


                }
这里传递的参数是用户id以及用户的新密码,注意请求方式使用Put。
随后在后端Iris中添加更新逻辑:
app.Put("/admin/user_action/", func(ctx iris.Context) {

		ID := ctx.PostValue("id")
		Password := ctx.PostValue("password")

		user := &model.User{}
		db.First(&user, ID)

		user.Password = mytool.Make_password(Password)
		db.Save(&user)

		ret := map[string]string{
			"errcode": "0",
			"msg":     "更新密码成功",
		}
		ctx.JSON(ret)

	})
这里使用Put函数监听路由,随后接受参数ID和Password,注意Put和Post方式都采用ctx.PostValue函数来获取参数。
接着使用db.First(&user, ID)函数来进行主键查询,查出用户的结构体变量对象,最后调用db.Save函数来存储更新结果:
MySQL [irisblog]> select * from user where id = 16\G
*************************** 1. row ***************************
        id: 16
created_at: 2022-08-22 19:41:40
updated_at: 2022-08-23 15:41:09
deleted_at: NULL
  username: admin
  password: 202cb962ac59075b964b07152d234b70
1 row in set (0.00 sec)

MySQL [irisblog]>
可以看到,password和updated_at两个字段已经同步更新了。
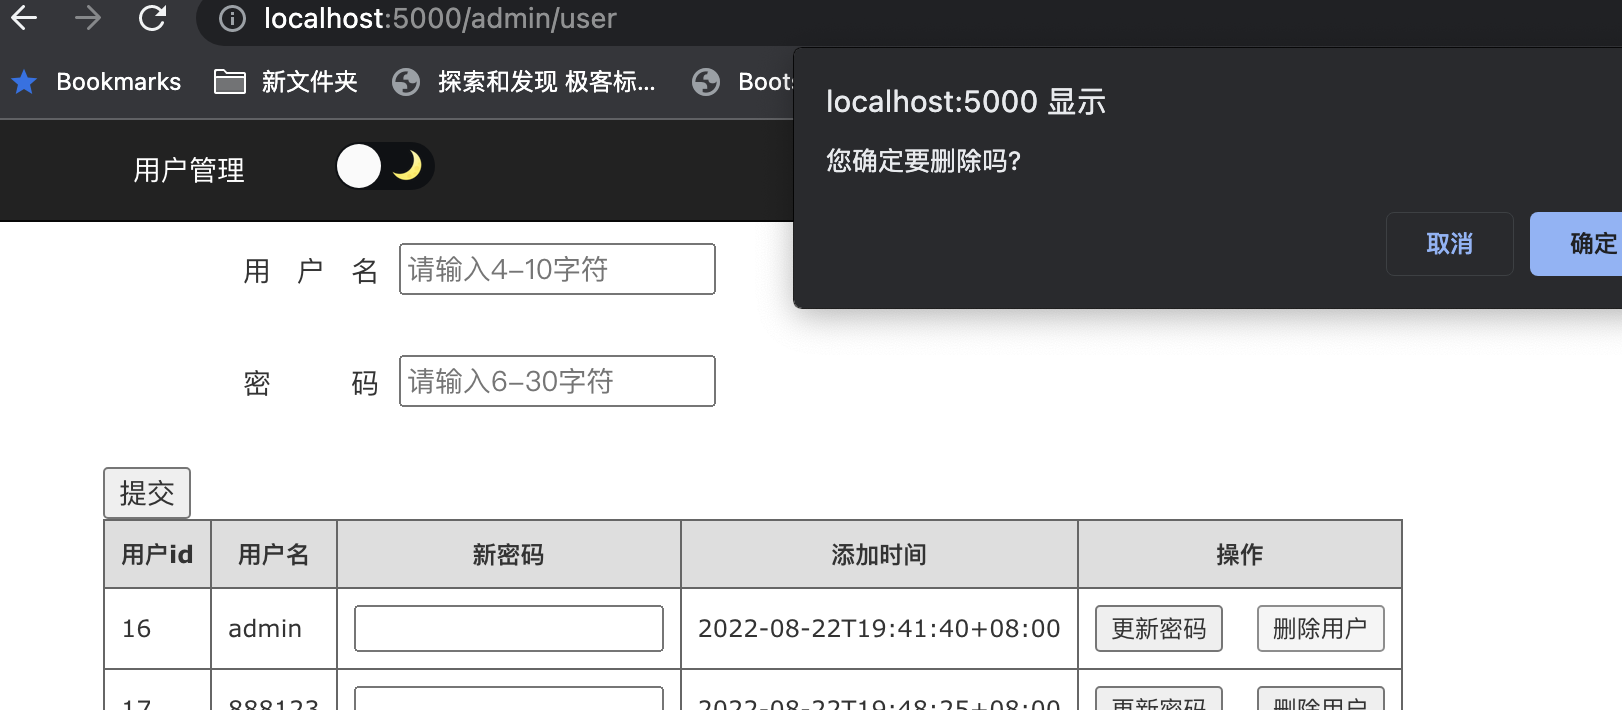
接着是删除操作,首先前端添加删除按钮:
<tr v-for="(item,index) in userlist">
                    <td>{{ item.ID }}</td>
                    <td>{{ item.Username }}</td>
                    <td><input type="password" v-model="newpass[index].value"  /></td>
                    <td>{{ item.CreatedAt }}</td>
                   <td>

                    <button @click="update(index)">更新密码</button>


                    <button @click="del(index)">删除用户</button>


                    </td>                </tr>
随后绑定删除事件:
del:function(i){

                    var r=confirm("您确定要删除吗?");

                    if (r==true){

                        this.myaxios("http://localhost:5000/admin/user_action/","delete",{"id":this.userlist[i].ID}).then(data => {
                        console.log(data)
                        alert(data.msg);
                    });


                    }


                },
注意这里的请求方式是delete。
如图所示:
随后编写后端删除逻辑:
app.Delete("/admin/user_action/", func(ctx iris.Context) {

		ID := ctx.URLParamIntDefault("id", 0)

		db.Delete(&model.User{}, ID)

		ret := map[string]string{
			"errcode": "0",
			"msg":     "删除用户成功",
		}
		ctx.JSON(ret)

	})
这里使用Delete函数来监听路由,同时通过ctx.URLParamIntDefault函数获取前端请求的参数,注意Get和Delete方式获取参数的请求函数是一致的,同理,Post方式和Put方式也是相同的。
接着使用db.Delete(&model.User{}, ID)函数通过用户结构体做主键删除。
结语
至此,完成了用户结构体的增:用户添加(唯一索引拦截);删(主键删除);改(动态表单绑定修改密码);查(结构体单项和批量查询)。该项目已开源在Github:https://github.com/zcxey2911/IrisBlog ,与君共觞,和君共勉。